")
")


INSTALLING ACTIVE DIRECTORY LDS
Here are a few notes about installation for the purposes of this post: Link
The LDS partition name should be something unique and follow the normal distinguished name syntax. I used
dc=lds,dc=mydomain,dc=com
When translated to a domain name, this would be lds.mydomain.com.
- I used the default option of Network Service Account.
- I added all available schemas to the Selected LDIF files section.
- All other settings used default values/selections.
BACKUP AND RESTORE ACTIVE DIRECTORY LDS
Backup.
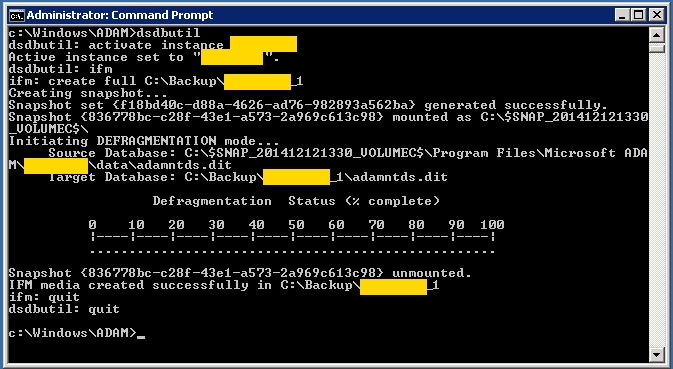
After you have AD LDS installed, create backup. Create folder "c:\Backup".
- Open a command prompt in administrator mode and type the following commands pressing enter after each line:
dsdbutil
activate instance mydomain
ifm
create full C:\Backup\mydomain_1
quit
quit
The backup should take less a minute.
Restore.
CONFIGURING ACTIVE DIRECTORY LDS FOR SITECORE
After you have AD LDS installed, there are a few basic procedures you need to perform: Import the MS-adamschemaw2k8.ldf file using LDIFDE
This will add the ''sAMAccountName'' and ''ms-DS-User-Account-Control-Computed'' attributes to the base schema and allow them to be used by user objects in LDS. These attributes are used and referenced by the AD membership provider in the Sitecore AD module. While it is possible to configure the AD module to reference the ''userDisplayName'' attribute for usernames instead of the ''sAMAccountName'' attribute, the default is ''sAMAccountName'' and it doesn't hurt to import the full MS-adamschemaw2k8 schema in the event you'll be synchronizing LDS with AD. Also, the Sitecore AD Role Provider explicitly uses ''sAMAccountName'' when retrieving roles and role names.
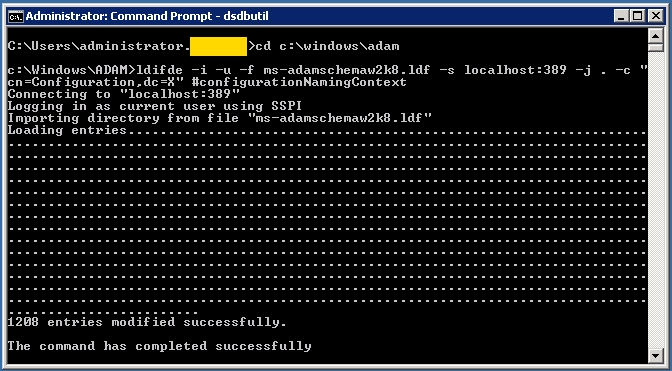
Open a command prompt on the LDS server with administrator privileges. Navigate to 'c:\windows\adam'
cd c:\windows\adam
Run the following command:
ldifde -i -u -f ms-adamschemaw2k8.ldf -s localhost:389 -j . -c "cn=Configuration,dc=X" #configurationNamingContext
The import should only take a minute or two.
- After it has completed, open ADSI Edit (found under Administrative Tools)
- Connect to your LDS instance (e.g. localhost:389)
- After connecting, right click on the LDS server node and select Update Schema Now.
This will clear the schema cache and load the schema changes you imported.
Create Users container
Using ADSI Edit, connect to your LDS instance (e.g. localhost:389)
- Once connected, right click on the root container (e.g. dc=lds,dc=mydomain,dc=com), then select New -> Object...
- Choose container from the class list
- Name the object ''Users''. Technically, you can name the object something other than ''Users'' if you'd like, but this will be the location where users are stored and defined.
- Ok out of the dialogs
Create an Administrator User
You need to create a user that is a member of the LDS Administrators role in order to connect to your LDS instance from Sitecore. This user doesn't need to correspond to a Sitecore content author or administrator, the user is essentially only needed for communication with LDS via the membership provider.
- Right click on the Users container you created, then select New -> Object...
- Choose user from the class list
- Provide a username (exp. ''ldsadmin'')for the user object when prompted and ignore the More Attributes option
- Right-click on the user object you just created and select Reset Password... use a strong password containing mixed case alphanumeric characters and special characters.
- Right-click on the user object again and select Properties
- Scroll to the ''displayName'' attribute and set the value of the attribute to the name of the user object you created (exp. ''ldsadmin'')
- Scroll to the ''msDS-[wiki:UserAccountDisabled]'' attribute and set the value of the attribute to FALSE, then
- Scroll to the ''sAMAccountName'' attribute and set the value of the attribute to the name of the user object you created (exp. ''ldsadmin'')
- Scroll to the ''sn'' attribute and set the value of the attribute to the name of the user object you created (exp. ''ldsadmin'')
- Scroll to the ''userPrincipalName'' attribute and set the value of the attribute to the name of the user object you created (exp. ''ldsadmin'')
- Ok out of the dialogs
Assign User to Administrator Role
- Expand the Roles container
- Right click on the Administrators object, then select Properties
- Scroll to the ''Member'' attribute and click the Edit button
- In the editor dialog, click Add DN...
- When prompted, provide the distinguished name (DN) for the user you created earlier. The DN will be something like this: CN=ldsadmin,CN=Users,DC=lds,DC=mydomain,DC=com
- Ok out of the dialogs
Create an User
- Right click on the Users container you created, then select New -> Object...
- Choose user from the class list
- Provide a username (exp. ''ldsuser1'')for the user object when prompted and ignore the More Attributes option
- Right-click on the user object you just created and select Reset Password... use a strong password containing mixed case alphanumeric characters and special characters.
- Right-click on the user object again and select Properties
- Scroll to the ''displayName'' attribute and set the value of the attribute to the name of the user object you created (exp. ''ldsuser1'')
- Scroll to the ''msDS-[wiki:UserAccountDisabled]'' attribute and set the value of the attribute to FALSE, then
- Scroll to the ''sAMAccountName'' attribute and set the value of the attribute to the name of the user object you created (exp. ''ldsuser1'')
- Scroll to the ''sn'' attribute and set the value of the attribute to the name of the user object you created (exp. ''ldsuser1'')
- Scroll to the ''userPrincipalName'' attribute and set the value of the attribute to the name of the user object you created (exp. ''ldsuser1'')
- Ok out of the dialogs
Assign User to Users Role
- Expand the Roles container
- Right click on the Users object, then select Properties
- Scroll to the ''Member'' attribute and click the Edit button
- In the editor dialog, click Add DN...
- When prompted, provide the distinguished name (DN) for the user you created earlier. The DN will be something like this: CN=ldsuser1,CN=Users,DC=lds,DC=mydomain,DC=com
- Ok out of the dialogs
Password Operations (Optional)
Password operations such as setting a password on a new user or resetting a password for an existing user are not allowed, by default, over an unsecured connection (i.e. non-SSL and the connectionProtection attribute on the membership provider definition is set to None). To allow password operations over an unsecured connection, you will need to perform the following steps on the LDS server. Note: this is only relevant if you use an unsecured (i.e. non-SSL-encrypted) connection.
- Open a command prompt in administrator mode
- Type
cd %windir%
dsmgmt
- Type the following commands pressing enter after each line:
ds behavior
connections
connect to server localhost:389
quit
allow passwd op on unsecured connection
quit
quit
connections
connect to server localhost:389
quit
allow passwd op on unsecured connection
quit
quit
This will allow you to perform password operations over an unsecured connection.